making a solar dehydrator
fab academy micro challenge #2
The second challenge was to develop an artifact that “allows to explain our project to others” or “interact with others so they understand our research project”. We could use the skills from the previous fab academy classes including: 3D scanning and printing, electronics design, computer controlled machining (here CNC milling), embedded programming.
To continue on the low tech exploration that we started with Gerda, we wanted to create a solar dehydrator to experiment with this method for food preservation without using energy. Julia and Fiorella had also started investigating about dehydrators but not solar and Roberto wanted to make an incubator.
We decided to team up and make a hydrid object made of different boxes. We liked the idea of making a modular device and the multipurposes of the solar capture module.
In the future, other people could create other projects that need solar heating for example and that could just be nested on top of the solar capture module. We could imagine a collection of these boxes, each having their own function and that could be used independently.
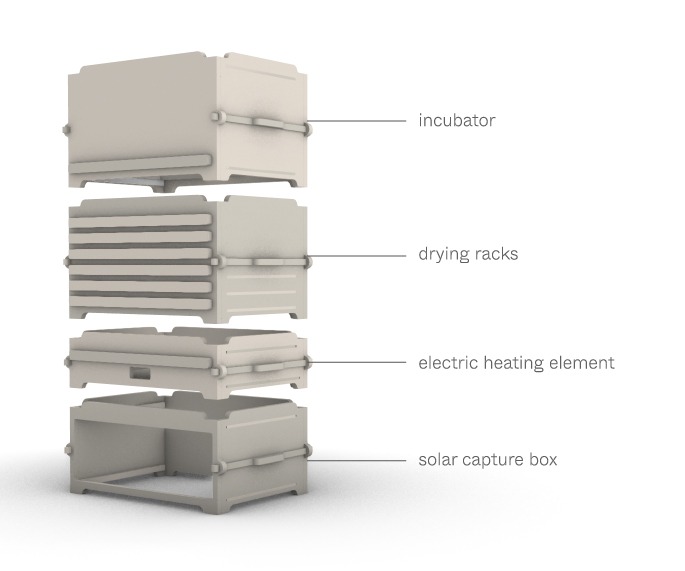
Elements of the hydrid dehydrator/incubator
Bases (one or the other can be used depending on the weather)
- (Base 1) A solar capture foldable module to use outdoors on sunny days (we were inspired by this design for the foldable part —)
- (Base 2) An electric heating module for inside uses
Top boxes
- (D) A dehydrator module with drawers (drying racks) to place the food or plants that need to be dehydreated
- (I) An incubator module that can be placed on top on the dehydrator module
Possible combinations:
- Base 1 + D // Base 1 + I // Base 1 + D + I
- Base 2 + D // Base 2 + I // Base 2 + D + I
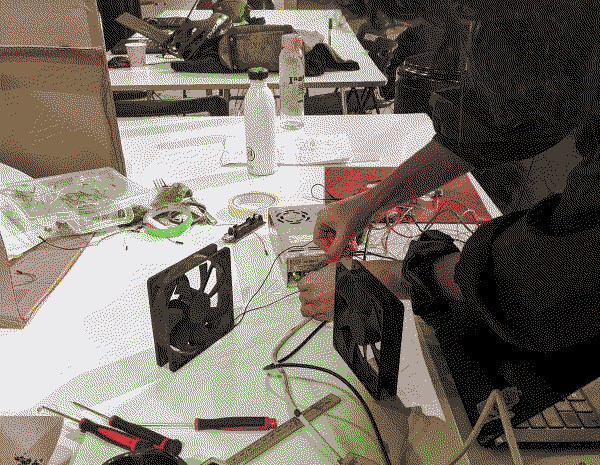
Functionning: Whether the base used is the solar or the electric one, we wanted to regulate the temperature and humidity indide. To do so, we will have temperature and humidity sensors in each of the two top boxes as well as fans that will be triggered each time one of the boxes reaches defined temperature and humidity levels.
Team work: After agreeing on the general design and functionning, we divided the tasks and I was in charge with Fiorella to do the electronics part. The details of the steps we followed are all documented on the website (see link below).
The main challenges for this part were:
- understand how to power all the different components with the right power supply,
- understand how the components I had never used before worked together and could be wired and programmed especially the relay and the Digital Temperature Humidity Sensor (we used a library to be able to read the sensor values),
- create the right logic diagram so the fans turn on when specific conditions are met in each of the two top boxes (dehydrator and incubator).
Overall experience:I am a bit disappointed by the result of our work during this challenge. As we were a large group of 5 people, we wanted to complexify the project which went from a solar dehydrator to a solar/electrical/dehydrator/incubator! But in the end, doing this took much more time to design the boxes and we had more than a hundred pieces to cut with the CNC milling machine. We have not had time to cut on the Thursday so we could only cut our pieces on the last day Friday morning. Even at this moment, the solar capture module (which for me was the most important regarding my research topic) was not part of the pieces being cut because of lack of space on the board. It was a bit of a lack of coordination in our team, if we had to do it again, we should have done only one of the two top boxes to gain space and design time and prioritize the core function of the object (MVP). .As an alternative, we decided on Friday to cut the foldable solar capture drawer in thin plywood with the laser cutting machine.
The fabrication processes, files of the design and code are all documented in this git repository that links to a dedicated website.